Recently we upgraded to a new, faster server for our websites. Ever since WSS v3 was released to the web I’ve been running SharePoint on my home server. But now with the new server hosted in Texas, I decided to move our SharePoint site to this server.
There are a few differences between my home server and our new web server. My home server is also my domain controller but I didn’t want to setup a domain on the new web server. The home server really only needs to service our needs, but our web server needs to be able to service the needs of myself and others. Because of these two differences, I needed a way to run multiple sharepoint sites that were totally independent of each other including users. This is normally done in SharePoint using Active Directory Account Create Mode, but like I said, I didn’t want to run a domain. A new feature with WSS V3 is the ability to have forms based authentication with ASP.NET’s membership providers. This was what I needed to do.
I first found this blog entry http://weblog.vb-tech.com/nick/archive/2006/06/14/1617.aspx?harrison on how to setup forms based authentication using a SQL Server membership provider. I was able follow his directions and set this up but there were a few issues. One, these directions assume that you will only be having one membership provider per sharepoint server, which was not the case for me. I needed to have a different membership provider for each sharepoint site on this one server. Second, I had no good way of adding, editing, and deleting users.
To fix the first issue involved doing a little copy and paste action out of the machine.config file into my web.config for the SharePoint site. I needed to change the name of the membership provider and tell this SharePoint site to use my newly named membership provider as the default provider. The reason I have to have a unique name for each SharePoint site is because I need to add every membership provider for all of my sites to the central administrations web.config. My SharePoint site’s web.config membership code looks like the following:
<membership defaultProvider="TheLineberrys_Users">
	<providers>
		<add name="TheLineberrys_Users" type="System.Web.Security.SqlMembershipProvider, System.Web, Version=2.0.0.0, Culture=neutral, PublicKeyToken=b03f5f7f11d50a3a" connectionStringName="LocalSqlServer" enablePasswordRetrieval="false" enablePasswordReset="true" requiresQuestionAndAnswer="true" applicationName="TheLineberrys" requiresUniqueEmail="true" passwordFormat="Hashed" maxInvalidPasswordAttempts="5" minRequiredPasswordLength="7" minRequiredNonalphanumericCharacters="1" passwordAttemptWindow="10" passwordStrengthRegularExpression="" />
	</providers>
</membership>
<profile enabled="true" defaultProvider="TheLineberrys_Profiles">
	<providers>
		<add name="TheLineberrys_Profiles" connectionStringName="LocalSqlServer" applicationName="TheLineberrys" type="System.Web.Profile.SqlProfileProvider, System.Web, Version=2.0.0.0, Culture=neutral, PublicKeyToken=b03f5f7f11d50a3a" />
	</providers>
</profile>
<roleManager enabled="true" defaultProvider="TheLineberrys_Roles">
	<providers>
		<add name="TheLineberrys_Roles" connectionStringName="LocalSqlServer" applicationName="TheLineberrys" type="System.Web.Security.SqlRoleProvider, System.Web, Version=2.0.0.0, Culture=neutral, PublicKeyToken=b03f5f7f11d50a3a" />
	</providers>
</roleManager>
Notice that my applicationName is the unique name of my website. This allowed me to have one membership database for all of the SharePoint sites but also be able to have completely seperate users, profiles, and roles.
To fix the second issue I found this blog http://weblogs.asp.net/scottgu/archive/2005/10/18/427754.aspx with sample code. This was good enough to start out with but didn’t provide all of the features I needed. I added this code as a virtual directory under my sharepoint website called profile. I next found http://www.qualitydata.com/products/aspnet-membership/default.aspx which provided a membership manager control that seemed to fit my needs perfectly. I had a few issues getting it working in my profile virtual directory because of SharePoint’s trust level. Eventually I found out that I needed to change the web.config of this virtual directory to full trust to fix my issues. The problem with the Membership Manager is it didn’t allow end users to manage their account, it was more of an administrator tool. So I decided to use a combination of the Profile Sample from Scott Guthrie and the Membership Manager. The Membership Manager will be my profile tools for administrators only, and from the Profile Sample I will use the changepassword and recoverpassword pages for the end users to do password management, and I will also use the createnewwizard as sort of a setup script when I first create a new SharePoint site.
After getting all of this working I needed to make it look pretty. I created my own SharePoint stripped master page based on C:\Program Files\Common Files\Microsoft Shared\Web Server Extensions\12\TEMPLATE\LAYOUTS\simple.master. Next I setup the colors for the Membership Manager to use SharePoint css classes and also made a profile landing page that based on your permissions and whether or not you are logged in shows the appropriate links.
But this wasn’t quite good enough. The end users would have to remember to go to /profile/ to change their password. This was unacceptable.
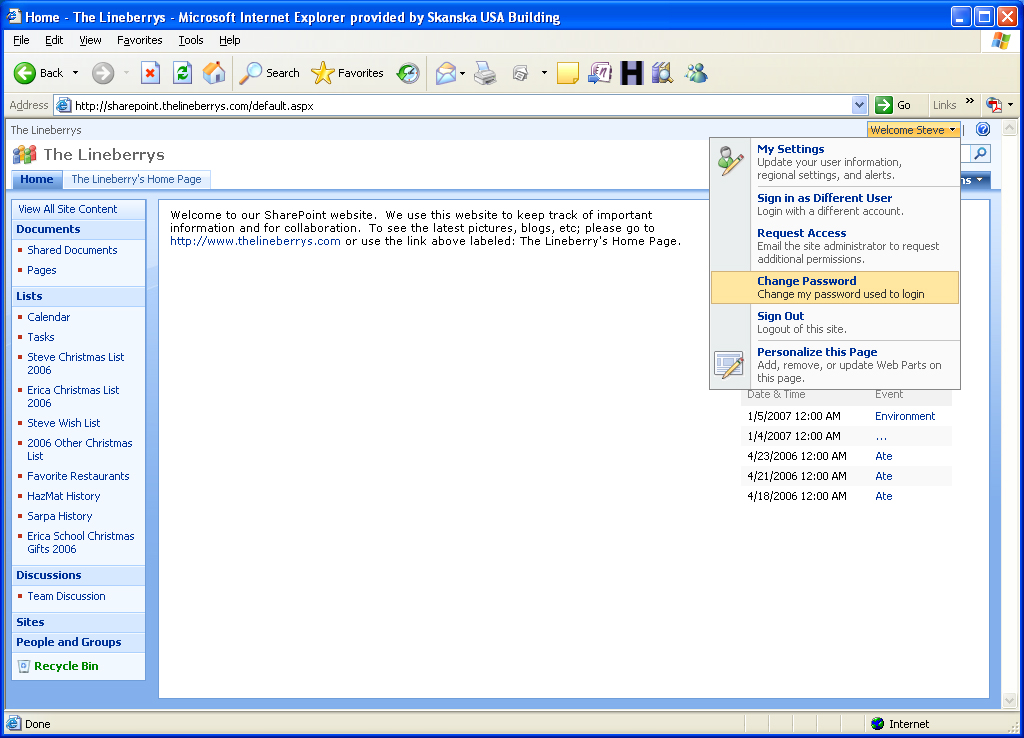
I decided to modify some of the SharePoint files. The first file I modified was C:\Program Files\Common Files\Microsoft Shared\Web Server Extensions\12\TEMPLATE\CONTROLTEMPLATES\Welcome.ascx which is the file that controls the menu items in the welcome menu at the top right of the page when you are logged in. I added the following right above the logout item:
<SharePoint:MenuItemTemplate runat="server" id="ID_ChangePassword"
Text="Change Password"
Description="Change my password used to login"
MenuGroupId="200"
Sequence="250"
UseShortId="true"
ClientOnClickNavigateUrl="/profile/changepassword.aspx"
/>
This now added a Change Password link on the welcome menu of every page for every SharePoint site on the server.
I also changed
C:\Program Files\Common Files\Microsoft Shared\Web Server Extensions\12\TEMPLATE\LAYOUTS\login.aspx which is the file people see when they are trying to login. I added the following right above the last </asp:Content>:
<p>
<a href="/profile/recoverpassword.aspx">Forgot your password?</a>
So now I have a change password link on every page when someone is logged in and a forgot your password link on the login page.
Another issue I ran into using forms authentication is the search seemed to not be working. I then found this page http://wsssearch.com/formauthentication.html that explains how you have to add another web application that is mapped to your forms authenticated web application so the search crawler can use windows authentication to crawl the website. After following the directions on that page my search was up and going.


