Securing the Untrusted Wireless Network on the Server

Windows 2003 Server provides lots of different out of the box firewall options. There is always the basic firewall either used on the NIC card or though routing and remote access. If you have routing and remote access installed, you can also use inbound and outbound filters. There is a third one that is often overlooked. That’s using IPSEC Security policies as a firewall. I personally use this one for my complex firewall requirement for the network card interface connected to my Untrusted Wireless Network.

I have only 3 simple rules for that network

1. Don’t Allow Clients in the Untrusted Wireless Network to connect to anything on the server, not even ping

2. Allow Clients on the Untrusted Wireless Network to connect to the VPN PPTP port and protocol (TCP 1723, IP 47)

3. Allow all connections from my Gateway Router (the DI-604 connected to our Roadrunner) because that router port maps to the server, and the server makes the connection to the correct client/service.

I basically send a range of ports from the router to my server because my router has a limited number of port map entries, and then the server uses port tunnel to connect the ports from the router to the correct clients. The reason I do it this way is because I can use netbios or DNS names in port tunnel and not have to resort to IP addresses only, like in the router config. This way if a computer changes IP addresses on my network, the port map still works.

Ok, the first thing you need to do is create a new IPSEC policy. Goto Administrative tools, and then Local Security Policy or Domain Controller Security Policy. Right click on IP Security Policies and click “Create IP Security Policy”. I named mine Packet Filter.

Next we will need to add the Block action to block certain traffic. Right click on “IP Security Policies” and click “Manage IP filter lists and filter actions”. Click the “Manager Filter Actions” tab. Click Add, go through the wizard with the defaults, name it block, and select block as the filter action. Ok out of everything.

Now right click on our new Security Policy and click properties. Click add, and go ahead and add the already created filter lists, All ICMP Traffic, and All IP Traffic both with the Permit filter action. I selected LAN for the network type on all of my filter lists.
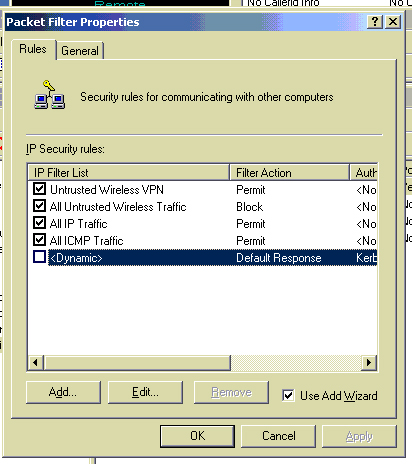
Next you will want to click Add again, but this time click the add button to add a new IP security rule, click through the menu and then click add again to add a new IP filter list. Name it and click Add. Lets create the All Untrusted Wireless Traffic first. I used the settings below. My Untrusted Wireless Network ranges from 192.168.1.1 to 192.168.1.255. Select the source address as a specific IP subnet. The IP address of 192.168.1.0 with a subnet mask of 255.255.255.0 will match every IP address in my Untrusted Wireless Network range. For the destination address I typed in the specific IP address of the network card that is connected to the untrusted network. For the protocol select Any. Finish the wizard and hit ok. Make sure your new IP filter list is selected in the list and click next. Select our new Filter Action of Block and finish the wizard.

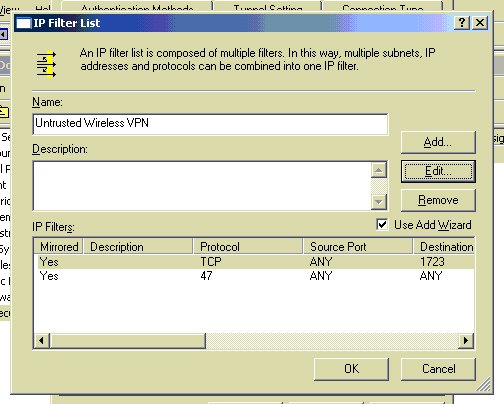
Next we’ll create the Untrusted Wireless VPN IP filter list. Using the same precedure above to create a IP filter list, use the same settings above for the source and destination but this time use these settings below for the protocol. Notice I added two IP filters to this IP filter list. That’s because PPTP VPN requires a TCP port of 1723 and it uses it’s own protocol called GRE, that is IP Protocol 47. When selecting the protocal for this one, select other, and type in 47. Assign this new IP filter list the Permit filter action.
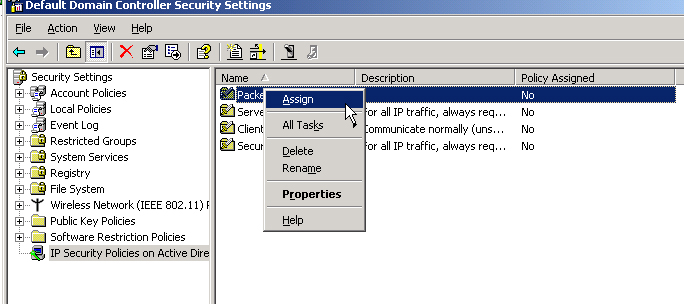
Lastly, we need to assign this IP Security Policy. Right click on the policy and click assign.
That’s it. Now all your traffic from your router should be allowed while no traffic from any wireless client is allowed except for if they are using VPN to connect to the server. I used the network monitor to determine that the source IP address from my router to my server was actually the routers external IP address (the one assigned by Roadrunner). That’s why I don’t need an extra policy specifing the internal IP address of my router to be allowed. If your router behaves differently, just add a ip filter list that matches your routers specific IP address and set the action to permit. Notice that you don’t have to worry about ordering the IP filter lists, it does that automatically for you.

This does not control what your wireless clients can and can’t do on the internet. This just prevents someone from hacking your less secure wireless network and then hacking your server to get access to the trusted network. So if someone does hack your wireless network, all they will be able to do is get internet access, they will think they are the only computer on the network and will be completely unaware of the trusted network unless they happen to be scanning IP addresses on the VPN port 1723. Then they will be suspecious but still will be unable to gain access to your trusted network.

Our Wireless Network

Our network works like this. We have our Roadrunner coming in to a Dlink DI-604 Router. From that router we have a US Robotics 8054 Wireless Access Point and Router running in AP mode, one network card in the server, and the wan port of another Dlink DI-604. This is my special wireless DMZ. Behind the second DI-604 I have all of the wired computer, the second network card in the server, and a Linksys WRT54G Wireless Access Point and Router also only being used as an access point. The linksys is new. Before we would connect to the US Robotics and then for wireless clients that needed special network access, we would VPN into the the server to get that access. The VPN access was a lot slower and had a tendency to get disconnected and you wouldn’t realize it or you would take your computer someplace and forget to reconnect to the VPN. I got the Linksys to run on the trusted network so I could have some wireless clients that are trusted connect to it and let the untrusted clients connect to the US Robotics but I needed a really secure solution for the trusted wireless network. I decided to use WPA with a Radius server using a User Certificate for authentication.

Server Setup

I got most of my setup information from this article, http://www.hansenonline.net/Networking/wlanradius.html.

First of all you need to get your Certificate services setup. You also need to install Internet Authentication Service (IAS). In IAS you need to add a RADIUS client. Make sure the Messenger Authenticator Attribute is checked.

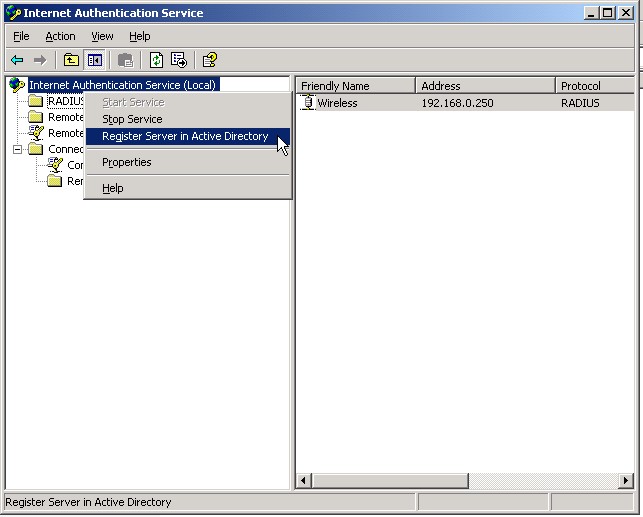
Next make sure you Authorize IAS in AD.

Next you’ll need to make a new Remote Access Policy. Use the wizard and make sure it has at least the NAS Port types shown below. This is also where it’s a good idea to specify a certain domain group that has access to the wireless. Then click Edit Profile and then click on the Authenication tab.

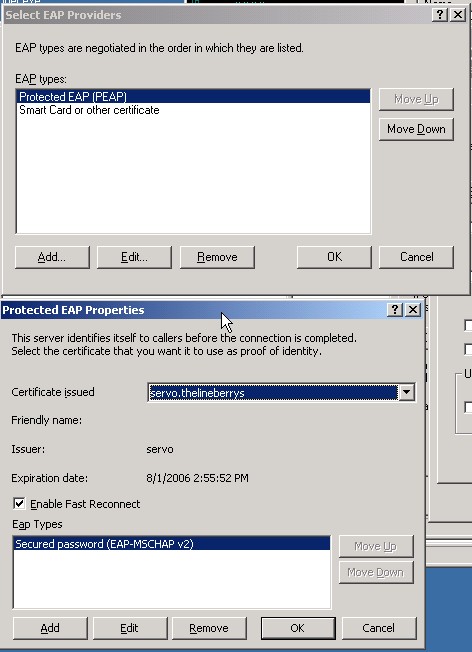
Then click on EAP Methods. PEAP is used if you just want to use Userid and passwords, add Smart Card or Certificate if you want to authenticate using certificates. If you plan on using PEAP make sure your settings are like that of below. Also make sure on both you select the correct server certificate.

That does it for the Server Setup.

Access Point Setup

All you have to do here is select WPA Radius or Radius. Enter your IAS Server’s IP address and the same passcode as you entered in the client setup in IAS.

Client Setup

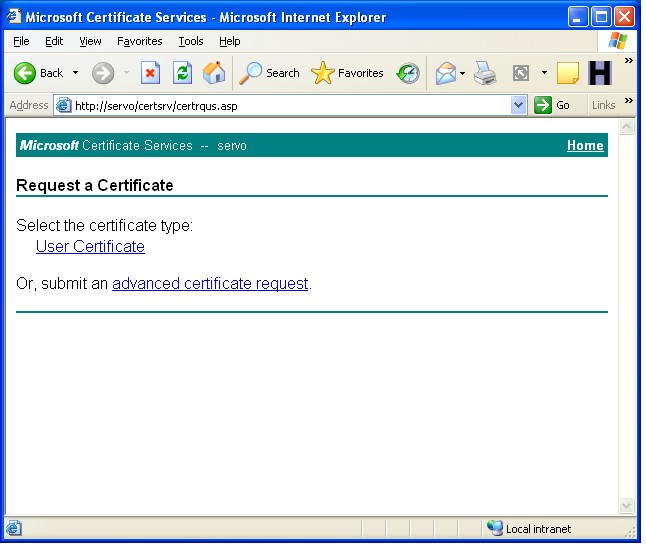
On the client side I use the Wireless Zero Configuration. The first thing you need to do is install the User Certificate from the server. You will need to connect to the trusted network probably through a direct ethernet connection. I have the ability to connect to my untrusted network and then VPN into the trusted network. Goto your server’s default website and then /certsrv/ as shown below. Click request certificate, then user certificate. Finish installing the certificate by following the rest of the directions.

Then open up you wireless configuration. Add the new wireless network, type in the SSID, Select WPA OR WEP (depending on what you set in the AP) and the same type of encryption you selected on the AP.

Next select whether you plan on using PEAP (authenticate using userid and password) or certificates (authenticate using certificates). Click properties. If you chose certificate then your next screen should look like the one below. Make your check boxes like mine, type in your full dns name for your server that is on it’s certificate into the connect to these servers field. Also make sure you select your server from the list of Trusted Root Certification Authorities.

That’s about it. You should now be able to connect to your wireles network. After I had it all setup and working, I turned off the SSID broadcast for the wireless. That means that no one else will even really know that this wireless network exists. This is completely secure because it requires that you be connected to the trusted network not on the wireless first to get the certificate, which means you should have access to the network. It also means that you need to have a AD userid and password. You don’t have to have your computer connected to the domain, just as long as the workgroup name is the same as the domain name and you use the same userid and password to log into windows as your AD userid and password. Also, since you are using WPA or WEP all your wireless data is encrypted.

New Server

I recently decided to get a new server for our house. My old Windows 2000 Server PIII 450 MHz with 4 SCSI drives totalling 45 GB and 512 MB of RAM was getting pretty bogged down. We use this server for our domain authenitication, port mapping, web sites, extra disk space, and it tracks the callerid of every person who calls our house. I ended up getting a Windows 2003 Server AMD 2900+ 2.0 GHz computer with 1 GB of RAM and a 200 GB SATA hard drive.

Since I wanted this to be a direct replacement of my old one, I needed it to have the same name as the old one and the same IP addresses. This caused a little difficulty since if you have Active Directory installed, you can’t rename the computer. So I had to get the new computer up and running, add it to the domain, add active directory and let it sync. Then I could remove Active Directory from the old server, rename it, then install active directory, and let it sync. Then I did the same with the new server, remove AD, rename, reinstall, sync. But the problem came in when I was trying to remove AD. It wouldn’t let me. So I had to unplug it from the network and force AD to remove. Then I was able to do the rename and everything seems fine. I replace the old server with the new one.

It wasn’t until I was trying to install certificate services that I started running into issues. It would install but I could never start the service, it kept saying “The directory service was unable to allocate a relative identifier.” I finally figured out the reason for this was because no computer in my network had any FSMO Roles. This was because when I forcefully removed AD from the new server it never transferred any of those roles to the old server. So of course the old server couldn’t transfer those roles back to the new server. So I had to seize all the roles using ntdsutil.exe. Once that was done I was able to successfully install and start cerficate services.

But then when I was trying to setup the user certificate templates, I was unable to do any template stuff. This was because I didn’t install Certificate services as an Enterprise CA. That option was grayed out for me. Turns out that I also needed to make the new computer the Global Catalog Server. After a reboot I was finally able to install Certificate Services as an Enterprise CA, and thus be able to issue User Certificates.

All the Certificate stuff was for what I was planning for my wireless network. In my next blog, I’ll explain how my network is setup and how to setup windows 2003 server as a radius server and use certificates for authentication on your wireless network.